Part design · geometry beats wall thickness
Ribs, Bosses and Gussets: Stiffness Without Sink Marks
Thickening a wall is the most expensive way to buy stiffness: it adds mass, adds cycle time, and often creates the sink mark it was meant to avoid. Ribs, bosses and gussets put the same material further from the neutral axis — and they follow rules that are easy to state but easy to break at the joint.
Most parts that come back for a second cut come back for the same reason: they were too flexible somewhere, so the whole wall was made thicker. It works, but it is the crudest fix available, because it pays for stiffness with weight, cycle time and — quite often — the very sink mark it was supposed to remove. Ribs, bosses and gussets exist to solve the same problem with far less material. The rules for them are old and well tested; the part that fails is almost never the rule, it is the joint, where the geometry does something different from what the drawing implies.
Stiffness follows distance, not thickness
The bending stiffness of a flat plate scales with the cube of its thickness, but the stiffness of a ribbed section scales with the square of how far the rib material sits from the neutral axis. That single comparison explains the whole subject. A 1.2 mm rib on a 2.0 mm wall can make a panel several times stiffer while adding a fraction of the material that thickening would, because the material is working at a distance instead of sitting in the middle of the section doing very little. It also explains the failure mode of the shortcut: pour plastic into the wall and the part gets heavy, warps more, cools slower, and can still sag, because all that new mass is in the wrong place.
In practice a rib is the cheapest stiffness anyone can draw. The limit is not structural — it is thermal and cosmetic. Every rib is a change in section thickness, and a change in section thickness is exactly where plastic stops behaving uniformly. The rest of this article is mostly about that sentence.
The rib rules worth memorising
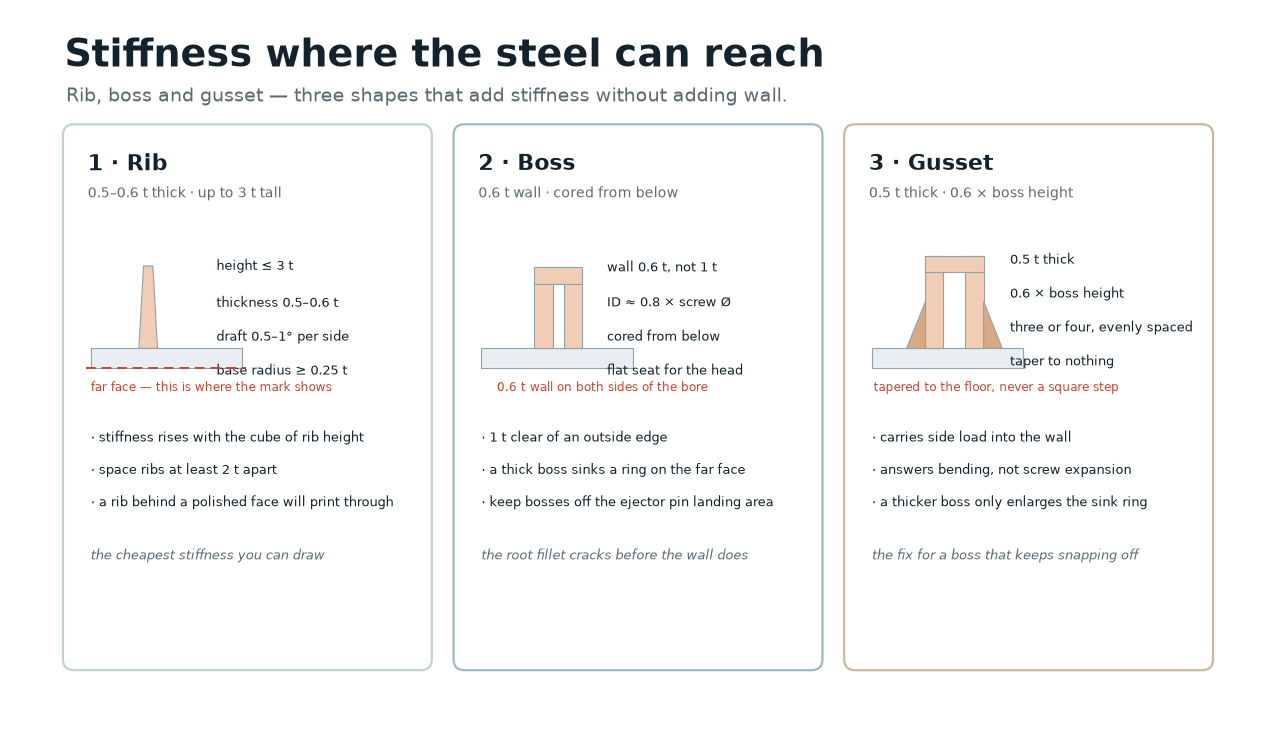
- Rib thickness 0.5–0.6 × the adjoining wall. Use 0.5 for PC, ABS, POM and glass-filled grades, 0.6 for PP and PE, which shrink more and forgive it more readily.
- Rib height up to roughly 3 × wall. Beyond that the rib stops earning its keep: it buckles, it fills badly at the far end, and it needs more draft than the space leaves.
- Draft 0.5–1° per side. A rib is a deep narrow slot in the steel and a deep narrow core in the plastic; both sides have to release, and a polished rib is harder to eject than any other surface on the tool.
- Spacing at least 2 × wall between ribs. Pack them closer and the gaps behave as thin ribs of their own, the section cools as one thick block, and warpage appears between the ribs instead of at the edges.
- Base radius at least 0.25 × wall. A sharp internal corner is a stress riser in the part and a corner no cutter reaches cleanly.
- Never a rib directly behind a class A surface. Put it there and the sink mark travels to the face the customer looks at, whatever the packing profile says.
| Feature | Rule of thumb | What it buys | If ignored |
|---|---|---|---|
| Rib | 0.5–0.6 t thick, ≤ 3 t tall | bending stiffness with little mass | sink opposite, short shot at the tip |
| Rib base | radius ≥ 0.25 t | fatigue life, clean fill | cracking from the root outward |
| Boss | 0.6 t wall, cored below | screw fixing without a thick mass | sink ring, split on assembly |
| Gusset | 0.5 t thick, tapered | takes side load into the wall | boss snaps at the first drop |
| Rib spacing | ≥ 2 t apart | even cooling between ribs | warpage in the gaps |
| Rib in steel | depth : width ≤ 4 : 1 | machinable with a small end mill | burned corners, tool marks to polish out |
Why the joint, not the tip, decides
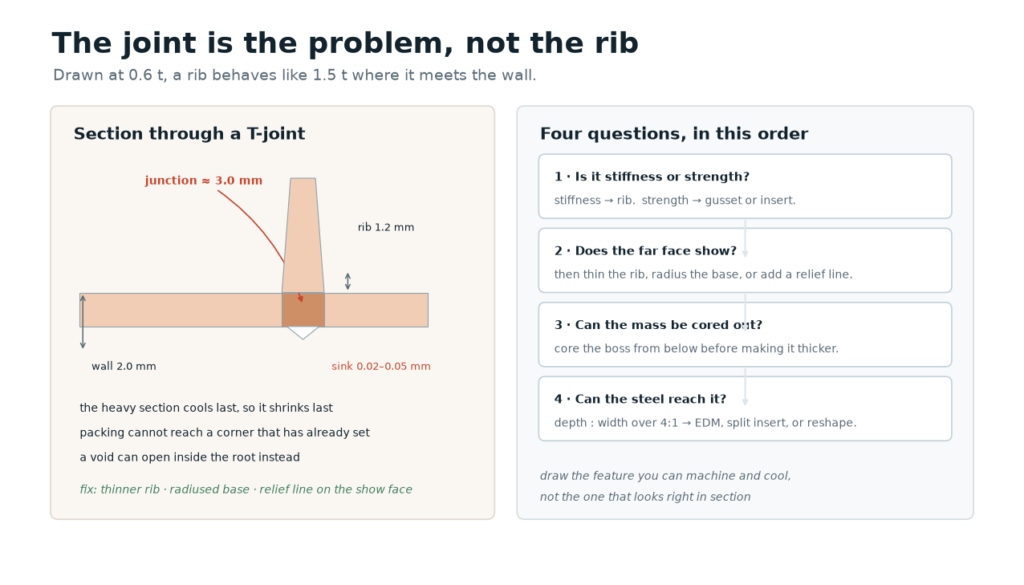
A rib drawn at 0.6 t is not 0.6 t at its base. Where the rib meets the wall, the two flows merge into a section that behaves like 1.3–1.6 × the nominal wall — a local heavy spot surrounded by thin material. That spot cools last. By the time it solidifies, the skin over it has already set, so the shrinkage has to go somewhere: it pulls the opposite face inward as a sink mark, or it opens a void inside the root where nobody will see it until the part is loaded. No packing profile rescues this. Packing harder helps near the gate and does nothing for a far corner that has already frozen.
The working fix is geometric, not process-based: keep the rib thinner than the wall, radius the base, and core out any material reachable from the other side. If a boss sits on a 2.0 mm wall, the wall plus the boss wall must not read as 3.2 mm of solid plastic to the cooling circuit — so the boss gets a cored underside, or the wall gets a local relief, or the boss moves. The same logic runs through the whole family of thickness problems described in our guide to uniform wall thickness.
Bosses: the feature that cracks first
A boss is a column of plastic with a bore in it, usually for a self-tapping screw or a heat-set insert. Almost every boss failure starts at its base, and almost every boss problem is predictable before the steel is cut.
- Wall thickness 0.6 × the adjoining wall. The instinct is to make a loaded boss thick; a thick boss sinks a ring on the opposite face and splits at the root when the screw is driven home.
- Inside diameter about 0.8 × the screw’s major diameter for thread-forming screws in ABS or PC, and tighter in glass-filled grades, where the material does not stretch to accommodate an oversized hole.
- Draft 0.5° minimum on the outside, and a flat top so the screw head has a seat.
- Cored from below wherever the geometry allows. A solid boss is a solid lump of plastic with a hole drilled into it — the worst possible shape for cooling.
- At least 1 × wall clear of an outside edge, and clear of where the ejector pins need to land, or the pins will push against a hollow column and mark it.
Read these together with the draft allowance on the rest of the part: a boss deep enough to need 1° of draft on the outside will also need draft on the core pin, and that pin is often the thinnest piece of steel in the tool.
Gussets do what a thicker boss cannot
When a boss has to resist a side load — a cover dropped on a corner, a connector pushed sideways, a screw driven by a power tool — the load arrives as bending at the base. Making the boss thicker answers a different question, and mostly makes the sink ring larger. Gussets answer the real one: they move material out to where the bending moment is highest and taper it back into the floor, so the load path runs from the boss into the wall rather than through a single small root fillet.
Three or four gussets, 0.5 × wall thick, running 0.6–0.8 of the boss height and tapering to nothing at the floor. Square full-height gussets are worse than none: they create a step that concentrates stress and a deep slot in the steel that fills badly and polishes worse. If the boss carries screw expansion rather than bending — a thread-forming screw in a thin grade — a gusset does nothing, and the answer is more wall thickness or a metal insert.
When the feature has to be on the outside
Sometimes the rib belongs on the visible side: a textured housing where the inside is full of electronics and the outside is the product. The honest options are narrow, and stating them early costs less than arguing about a first article later.
- Move the rib to the hidden side and accept a slightly larger section elsewhere.
- Thin the wall locally at the rib root — a relief groove 0.1–0.2 mm deep on the far side, which converts a visible sink mark into an intentional line.
- Choose a matte texture. A 0.02–0.03 mm depression disappears into a coarse grain and is obvious on a polished surface; that one decision often separates a passed first article from a rejected one, and it is the subject of texture and surface grade selection.
- Accept the sink mark, control it with packing and cooling, and say so on the drawing — so nobody measures it later against a specification that was never achievable.
What each feature costs the mold
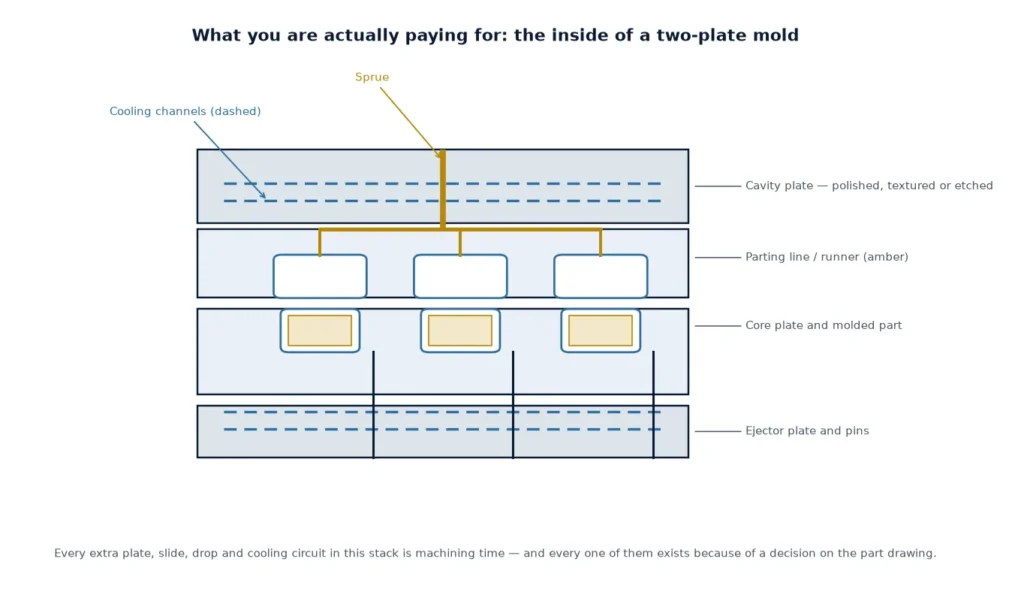
Ribs are a machining question before they are a moulding question. A rib 3 t tall and 0.6 t thick is a slot whose depth-to-width ratio can pass 4:1, at which point a small end mill cannot reach the bottom without chatter and the shop moves to EDM — slower, more expensive, and leaving a recast layer at exactly the corner where the part will be stressed. Deep ribs often want a split in the insert so the steel can be polished, and polishing matters more in a rib than anywhere else on the tool, because that is where the part is hardest to eject.
None of this argues against ribs. It argues for drawing them at 0.6 t rather than 1.0 t, and for telling the mold maker in the RFQ what the feature is for, so the steel is cut to suit the part instead of the part being reshaped to suit a cutter. That conversation is the same one our DFM checklist is built around, and it belongs before steel is ordered, not after.
Six numbers to put in the RFQ
- Nominal wall thickness, and the tolerance you actually intend to hold on it.
- Rib thickness, height and spacing — or the load the feature must carry, if you would rather the supplier sized it.
- Boss wall thickness, bore diameter and screw type: thread-forming, self-tapping or heat-set insert.
- Which faces are cosmetic, and the surface grade or texture on each of them.
- The draft the design already carries, and where it does not exist yet.
- Any dimension that cannot change, because a mating part you do not control already fixes it.
Where a design review catches it
Three checks catch most of these problems before the first cut. Section the model through every rib and boss and measure the thickness at the joint rather than the nominal wall. Look for isolated masses — a boss, a rib cluster, a thick corner — and ask what is supposed to cool them. Then run the fill analysis on the real section, not the average, because the average is precisely what hides the sink mark. A part that passes those three checks usually needs no heroics at T1; a part that fails them will need them anyway, at the worst possible moment.
Frequently asked questions
How thick should a rib be?
0.5–0.6 of the adjoining wall: 0.5 for PC, ABS, POM and glass-filled grades, 0.6 for PP and PE. Thicker ribs are only worth considering when the part is genuinely structural and the opposite face is not cosmetic.
How tall can a rib be before it stops helping?
About 3 × the wall thickness. Beyond that the rib buckles, the far end fills poorly, and the draft it needs starts to consume the space it was meant to use.
What wall thickness should a boss have for an M3 screw?
A wall of 0.6 × the adjoining wall, with a bore around 0.8 × the screw’s major diameter for a thread-forming screw — roughly 2.4 mm for M3 — and a cored underside wherever the geometry allows it.
Why is there a sink mark opposite my rib?
Because the junction is a local heavy section that cools last and shrinks last, pulling the far face inward. Thinner ribs, a radiused base and a relief line on the show face address the cause rather than the symptom.
Do gussets replace a thicker boss?
For side loads, yes: gussets carry bending from the boss into the wall. For hoop stress from a screw expanding the bore, no — that needs more wall or a metal insert.
When do ribs have to be EDM'd?
Once the depth-to-width ratio passes about 4:1, or when the corner radius is smaller than the smallest cutter available. The recast layer left by EDM should be polished out of any corner that will carry load.
Send the part before the steel
If a rib or boss is still open, send the STEP file and the load case. We will come back with the feature rules for your material and what each one costs to machine, before anything is cut.