Surface finish · SPI & VDI
SPI Mold Finish Standards: Choose Texture Before the Steel Is Cut
A1 or D2 changes draft, polishing hours and reject rate on the same part. Here is how the SPI finish scale actually works on the shop floor, and what to put on the RFQ so nobody guesses.
Two mold shops can quote the same part, the same steel and the same cavitation and still land 30% apart — because one quote assumes an A2 polish and the other assumes a D2 texture. Surface finish is not a cosmetic detail you settle after trial shots. It decides how many hours a polisher spends on the cavity, how much draft the sidewall needs, whether a weld line shows, and how many parts get scrapped before the texture stabilises. On this job it is cheaper to argue about finish on paper than on steel.
What the SPI finish scale actually describes
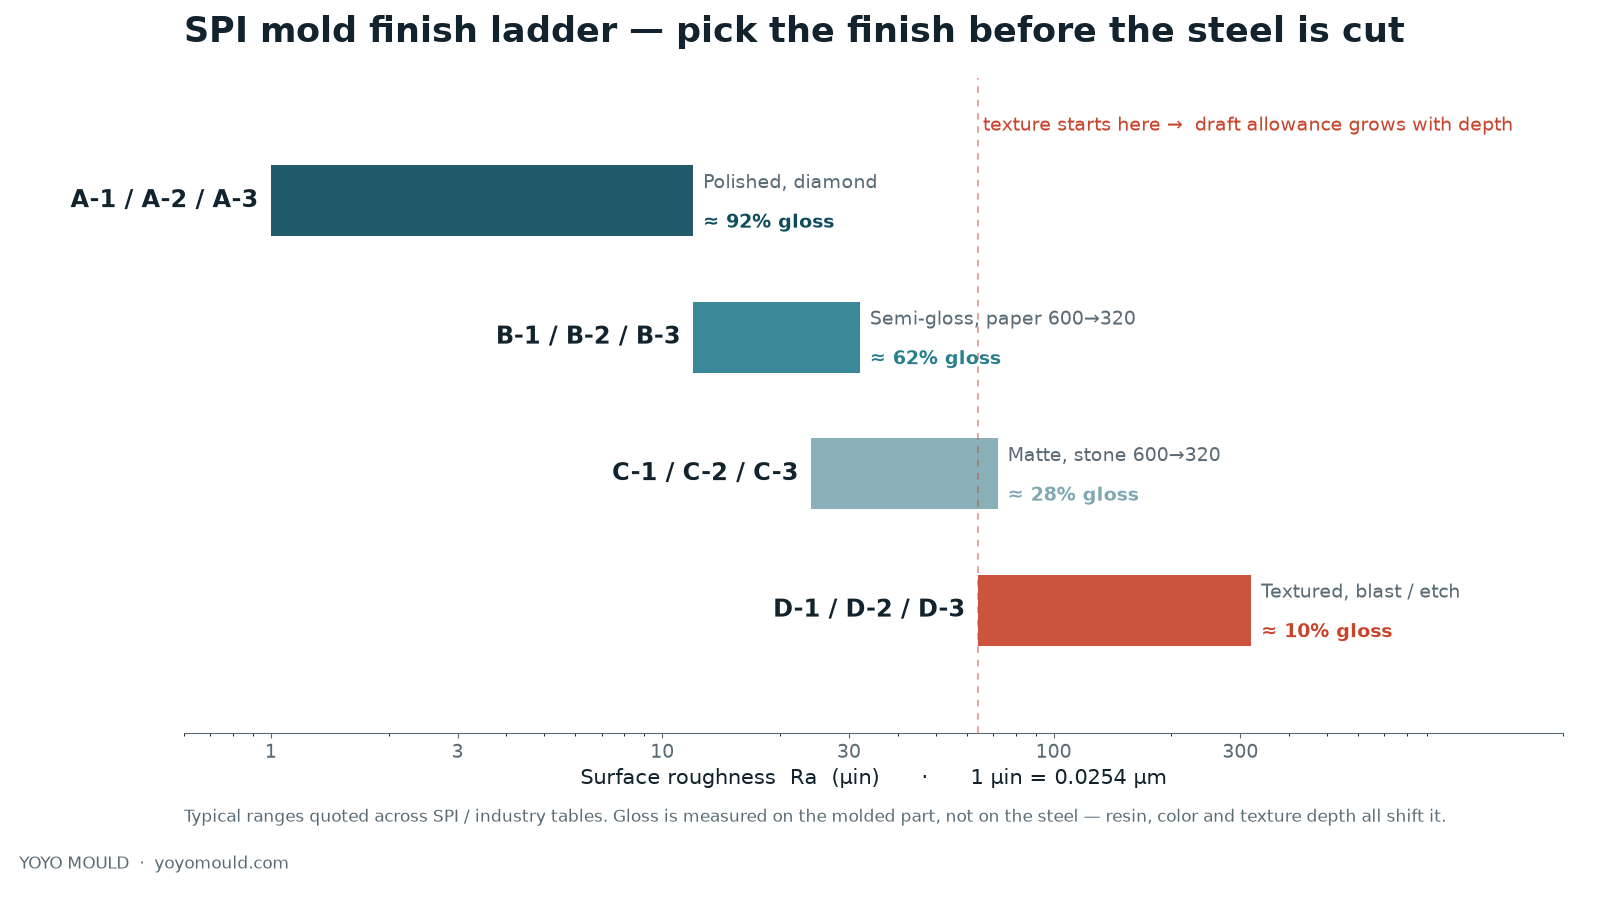
The SPI (Society of the Plastics Industry, now PLASTICS) scale is a set of twelve reference finishes, grouped A to D by how the steel is prepared. A grades are diamond-polished. B grades are polished with abrasive paper. C grades are finished with stones. D grades are dry-blasted or acid-etched, which is where real texture begins. The number inside each letter grades the fineness within that family — A1 is the finest, D3 the coarsest.
Two things trip people up. First, SPI grades describe the steel, but buyers judge the molded part: the same A2 cavity will read glossy in ABS and noticeably softer in a matte PP with 30% glass. Second, the Ra values you see quoted everywhere are typical ranges from reference tables, not a specification a polishing shop can hold to a tenth of a micron across a cavity with ribs, bosses and a slider. Treat the chart below as a shared vocabulary, then confirm the actual finish on a texture plate or a sample part.
The SPI finish chart, and what each grade is usually for
| SPI grade | Steel prep | Typical Ra | Appearance | Usual parts |
|---|---|---|---|---|
| A-1 | Diamond polish, 3 µm | 1–3 µin (0.025–0.075 µm) | Mirror, optical | Lenses, light guides, cosmetic windows |
| A-2 | Diamond polish, 6 µm | 2–8 µin (0.05–0.20 µm) | High gloss | Appliance fronts, automotive interior bright parts |
| A-3 | Diamond polish, 15 µm | 4–12 µin (0.10–0.30 µm) | Gloss | Housings, consumer electronics shells |
| B-1 | Paper 600 grit | 4–12 µin (0.10–0.30 µm) | Semi-gloss | General visible parts, toys |
| B-2 | Paper 400 grit | 12–24 µin (0.30–0.60 µm) | Semi-matte | Industrial housings, power tools |
| B-3 | Paper 320 grit | 24–32 µin (0.60–0.80 µm) | Matte | Hidden but handled parts |
| C-1 | Stone 600 grit | 24–40 µin (0.60–1.00 µm) | Dull matte | Under-hood, brackets |
| C-2 | Stone 400 grit | 40–56 µin (1.00–1.40 µm) | Matte | Structural parts, jigs |
| C-3 | Stone 320 grit | 56–72 µin (1.40–1.80 µm) | Rough matte | Non-visible, thick sections |
| D-1 | Glass-bead blast | 40–80 µin (1.0–2.0 µm) | Light texture | Textured grips, textured panels |
| D-2 | Dry blast, medium | 80–120 µin (2.0–3.0 µm) | Medium texture | Leather grain, automotive trim |
| D-3 | Coarse blast / etch | 120+ µin (3.0 µm+) | Heavy texture | Deep wood grain, heavy-grip tools |
VDI 3400 versus SPI — they do not convert
European toolmakers quote Mold-Tech or VDI 3400 numbers, Asian shops usually quote SPI or a photo. VDI 3400 uses a single numeric scale where the number rises as the surface gets finer, the opposite direction of intuition, and it is defined on the steel rather than on the part. One VDI number also fixes both depth and spacing of the texture, while an SPI D grade leaves pattern geometry to the etching house. That is why a customer who asks for “VDI 27, like SPI B2” is really asking for two different surfaces. If your print came from Europe, send the photo or the plate reference along with the number; if it came from a US buyer, expect the texture house to translate it — and check the first etched sample before the whole cavity is done.
Draft is where texture quietly costs money
A polished A2 sidewall can run on 1–2° of draft on a shallow, rigid part. Put a 60 µm D2 texture on that same wall and the plastic now has to climb over every peak of the grain on the way out. The working rule of thumb is about 1° of extra draft per 0.001 in (25 µm) of texture depth, on top of what the geometry already needs. Deep texture, deep ribs, glass-filled resin and a textured wall that is already tight: that combination shows up as drag marks, white stress marks at the edge of the texture and, in the worst case, a cracked grain after a few thousand shots.
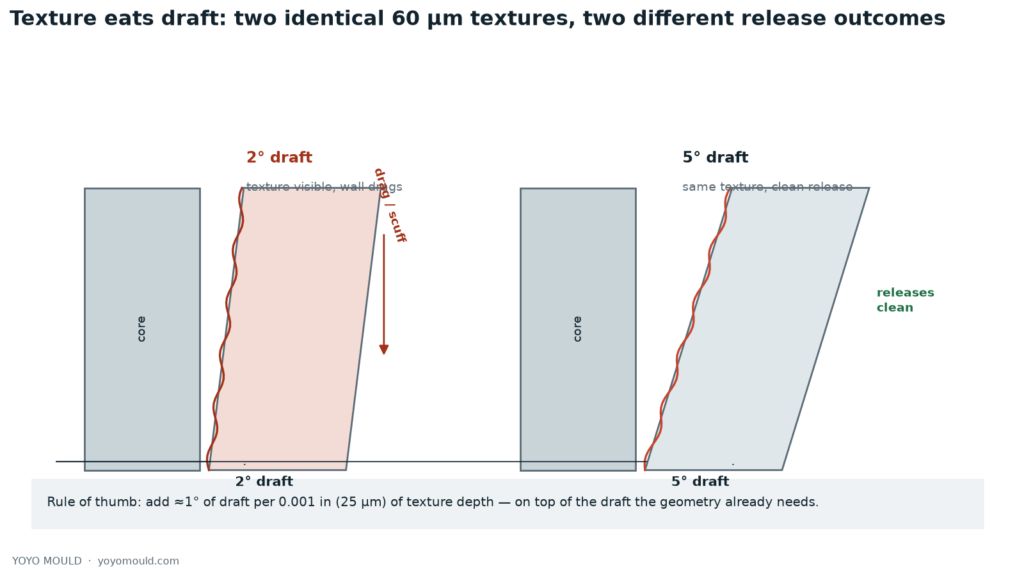
- Budget the draft for the finish, not for the polished steel: 0.5–1° extra per 25 µm of texture depth.
- Add more on deep ribs, tall bosses and any surface the part must slide across while shrinking.
- Glass-filled and mineral-filled resins erode texture peaks faster; expect a rougher hand after a few tens of thousands of shots.
- If the part needs a sharp cosmetic edge and a heavy texture, split the texture — stop the grain 2–3 mm short of the edge.
How to call out a finish on an RFQ
Most finish disputes come from a four-word note on the drawing. “Texture: light” is not a specification. What a toolmaker can actually build against is a grade plus a place plus a reference, in writing:
- Name the grade per surface: for example “all external A-surfaces SPI A2, internal ribs SPI C1”.
- Mark the cosmetic areas on the 3D data, or list them by face — a whole-part A2 call is what turns a mold into a polishing project.
- Attach a texture plate number, a photo of an accepted part, or a physical sample, and say which one governs if they disagree.
- State whether the finish applies to the first T1 sample or to the production tool — polishing after texturing removes the grain.
- Say if the part will be painted, printed or laminated. A C1 matte under a paint hides flow marks; an A2 under the same paint shows every wave.
- Confirm draft and the allowed texture depth together with the finish call, so the two do not fight on the shop floor.
Texture hides process sins — and reveals different ones
A light matte texture is the cheapest cosmetic fix in injection molding: it scatters light, so sink marks, flow marks and gate blush stop being an argument. That is why so many industrial housings ship in a B2 or C1 finish rather than the gloss the render suggested. But texture is not free of consequences — it changes how the melt fills and how the part reads under light.
- It flattens sink and flow marks, but it cannot hide a short shot or a cold slug: those still read as missing material and a dull patch.
- It hides weld lines on a matte surface and exaggerates them on a gloss one — if the gate position cannot avoid a weld, choose the finish accordingly.
- Deep grain traps release agent and dust; a textured tool needs a proper cleaning cycle, not a wiped rag.
- On thin walls, texture on both faces raises injection pressure and can push you to a bigger press — check clamping before you commit.
Polishing, gloss and class-A parts
Gloss is bought with hours. Going from B1 (paper 600) to A2 on a medium cavity is a sequence of stones, then diamond paste in steps — and every step has to be done by hand in the corners, around ejector marks and under a slider. That is the real reason an A2 tool costs more and takes longer to repair: a damaged A2 face cannot be spot-textured, it has to be welded, remachined and polished back through the whole sequence. A textured D2 face is easier to touch up locally with a patch grain, but the patch never matches perfectly, which is why texture houses keep the plate on file for the life of the tool.
If the part is a class-A visible surface, decide early which faces are truly class-A. Most projects that ask for “mirror finish everywhere” end up paying for polish on faces no one will ever see. We normally split the call by face: A2 on the two faces the customer sees, B1 on the rest, C1 inside. It cuts polishing time and it makes repair cheaper without changing how the part looks in the customer’s hand. The same reasoning sits behind the tolerances we agree before cutting steel on shrinkage and dimensional tolerance — decide what matters, then spend only there.
Steel, resin and how long the texture lasts
Texture life is a wear question, and the answer depends on the pair: steel hardness and resin aggressiveness. Pre-hardened P20 holds a fine grain well for commodity parts; 718H gives more consistency on large cavities; a hardened insert (or nitriding after texturing) is what keeps a grain alive on glass-filled nylon. Note the sequence: nitride after etching, never before, and only with a process that does not round off the peaks.
- Unfilled PP/PE: texture lasts a long time, but peaks polish down and gloss drifts up over production.
- ABS and PC: good reproduction of fine grain, sensitive to over-polishing during repair.
- PA with 30% glass: abrasive — plan for re-etching or insert replacement inside the tool life.
- PVC and flame-retardant grades: corrosive by-products attack both steel and grain; venting and cleaning discipline matter more than the finish itself.
What we ask before quoting a textured tool
When a project arrives with a texture on it, six questions decide the price, and they are the same six we would want answered if we were the buyer. Which faces carry the grain. Which grade or plate number governs. What draft is available on those faces once texture is added. Will the part be painted, printed or assembled against another surface. What is the expected shot count and resin. And who accepts the first etched sample — because the second etch is always a negotiation.
Get those on paper and the finish stops being a surprise line in the tool cost. It also makes the DFM conversation concrete: we can mark which features need draft added, which ribs should stay untextured, and where a slider would otherwise carry grain across a parting line. The checklist we run before cutting steel is public — DFM checklist before cutting steel — and finish sits in it next to draft, wall thickness and gate location. If the part also has an undercut, read undercuts, sliders and lifters first: grain on a slider face is its own problem, and it is easier to design out than to polish out.
Frequently asked questions
Which SPI finish should I specify for a visible housing?
For most appliance and consumer housings we quote B1 or B2: semi-gloss reads clean, hides flow marks and costs far less polishing time than A2. Go to A2 or A1 only on the faces the user actually looks at closely, and keep the internal faces at C1.
Does texture really need extra draft?
Yes. The working rule is about 1° of extra draft per 0.001 in (25 µm) of texture depth, on top of the draft the geometry needs. A 60 µm grain on a 2° wall will drag and scuff; the same wall at 5° releases cleanly. Deep ribs and glass-filled resins need more margin.
Can you match an existing part's texture?
Usually yes, if you can send the part or a photograph of the accepted grain with the area marked. We ask the texture house to match to a plate and etch a sample insert first, so you approve the grain before the whole cavity is done. Exact matches on heavily worn parts are not always possible.
Is a textured mold cheaper than a polished one?
The mold itself is not necessarily cheaper — etching is an extra step with its own lead time. What changes is the polishing hours and the repair cost: a textured face can often be patched, while a damaged A2 mirror face has to be welded, remachined and repolished through the full sequence.
Will texture hide sink marks and weld lines?
It softens them considerably on a matte or semi-matte surface, because the grain scatters light. It will not hide a short shot, a cold slug or a deep sink. If a weld line falls on a gloss face, the answer is gate or flow redesign, not a heavier texture.
What happens to texture on glass-filled resin?
Glass-filled PA and PBT are abrasive: the peaks round off and the part reads glossier over the tool life, and the grain needs re-etching or an insert replacement inside the planned shot count. Hardened inserts and nitriding after etching extend life.
Send us the part and the finish requirement
Upload 3D data with the cosmetic faces marked. We will come back with the finish call, the draft changes it needs and a mold quote — before any steel is cut.